Alright, let’s talk about these MOSFET driver circuits. For a long time, I just figured, hey, a MOSFET is a switch, my microcontroller spits out a high or low signal, job done, right? Hook ’em straight up. Man, was I in for a world of hurt with that thinking.

I remember this one project, trying to control a decent-sized motor. I wired the MOSFET gate directly to my Arduino pin. Fired it up. The motor kinda sputtered, didn’t have much oomph. And the MOSFET? You could have fried an egg on that thing. I thought maybe I had a bad MOSFET. Swapped it. Same deal. Then I noticed my Arduino was acting a bit flaky too. Probably stressed the pin out, lucky I didn’t kill it completely.
So, I started doing some digging. What was I missing? It turns out, these MOSFET gates, especially on the bigger guys you need for serious work, they’re like this big capacitor. You gotta dump a whole bunch of charge into them to get them to turn on fully, and you gotta suck it all out again to turn them off. And you gotta do it fast. My little microcontroller pin? It’s like trying to fill a swimming pool with a teaspoon. It just can’t push or pull current fast enough.
This slow switching, that was the killer. When the MOSFET is halfway on or halfway off, it’s resisting current like mad, and that’s what makes it heat up like crazy. And if it’s not switching fast, you can’t do high-frequency PWM, everything just gets sluggish and inefficient. It was a mess. I was facing a bunch of issues:
- MOSFETs getting super hot, like, dangerously hot.
- Slow switching speeds, which made my PWM signals look like garbage.
- Sometimes the MOSFET wouldn’t even turn on fully, so the motor or whatever I was driving was weak.
- I even suspected I was stressing out my microcontroller output pins.
It was a real pain, I tell ya.
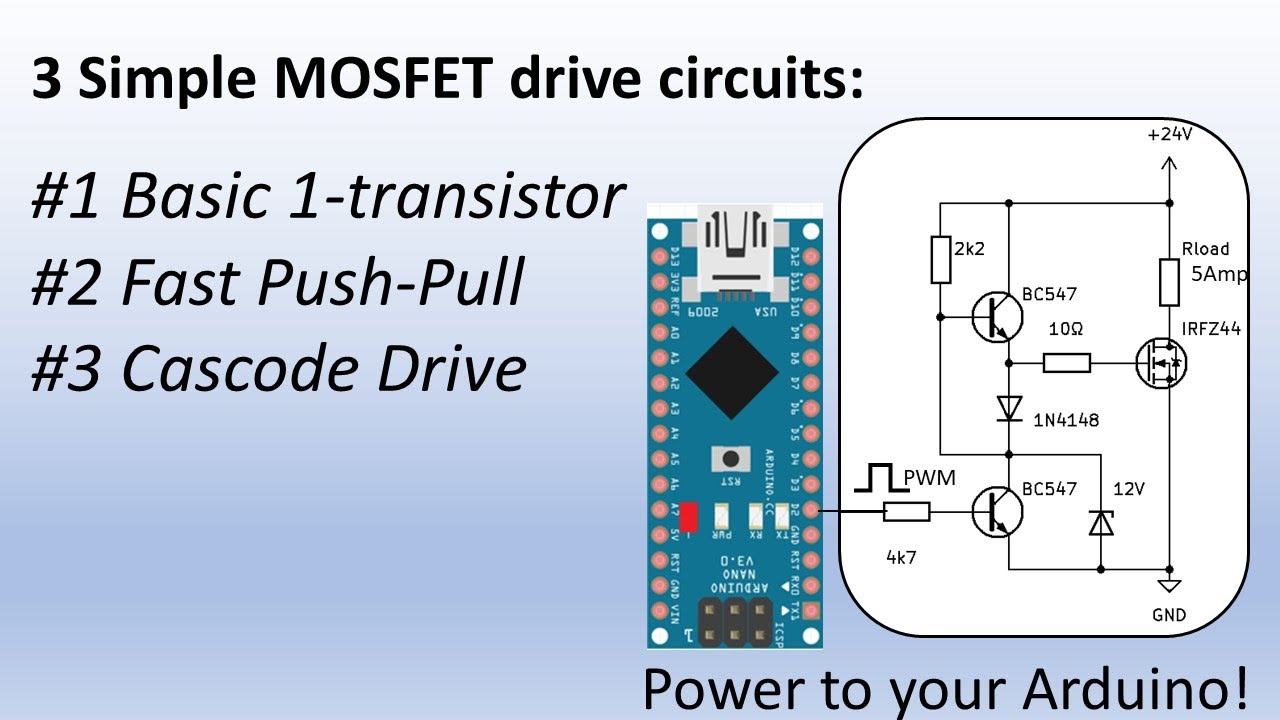
So, I learned I needed something called a ‘driver’. A dedicated circuit whose whole job is to give that MOSFET gate the good, hard kick it needs. There are fancy ICs out there, dedicated driver chips. And yeah, they’re great, often the best solution for complex stuff. But I wanted to understand what was going on, and sometimes you just need something simple you can whip up from parts you have lying around.
I started playing around with a basic totem-pole driver. Sounds impressive, but it’s really just two small bipolar junction transistors (BJTs) – an NPN and a PNP – working together. I grabbed a common NPN like a 2N3904 or BC547, and a PNP like a 2N3906 or BC557. A couple of resistors to limit base current, and that was pretty much it.
The idea is simple: when my microcontroller signal goes high, it turns on one BJT which yanks the MOSFET gate high, connecting it to a solid voltage source. When the micro signal goes low, it turns on the other BJT which yanks the MOSFET gate low, connecting it straight to ground. These little BJTs can handle much more current, much faster, than the micro pin alone. They act like current amplifiers for the gate.
So, I breadboarded this up. Input from my micro to the bases (through their resistors), collectors tied together to drive the MOSFET gate, NPN emitter to ground, PNP emitter to the positive supply. Hooked up my MOSFET, the motor, everything. Took a deep breath and powered it on.
Night and day difference. Seriously. The motor spun up strong and smooth. And the MOSFET? Barely warm to the touch! I put my oscilloscope on the gate, and the signal was beautiful – sharp rising edge, sharp falling edge. It was switching clean and fast. All because of those two little transistors and a couple of resistors.
That little experiment really hammered it home for me. You can’t just skimp on driving your MOSFETs properly, especially if you’re switching any decent amount of power or need speed. That driver stage, whether it’s a simple BJT setup or a fancy chip, it’s not optional; it’s crucial. It makes everything more reliable, more efficient, and stops your components from cooking themselves. It was a good lesson, learned the hard way, but learned well.