Getting Fed Up and Deciding to DIY
Alright, so I’d been having this nagging issue with my go-to airsoft rifle. You know the deal, trigger response getting a bit sluggish, sometimes it wouldn’t even fire on the first pull. Real annoying, especially in the middle of a game. I’d heard folks talking about MOSFETs, saying they’re the bee’s knees for fixing this and making your gun snappier. Figured, why not give it a shot myself? How hard could it be, right? Famous last words, sometimes.
Diving Down the Rabbit Hole of Parts and Wires
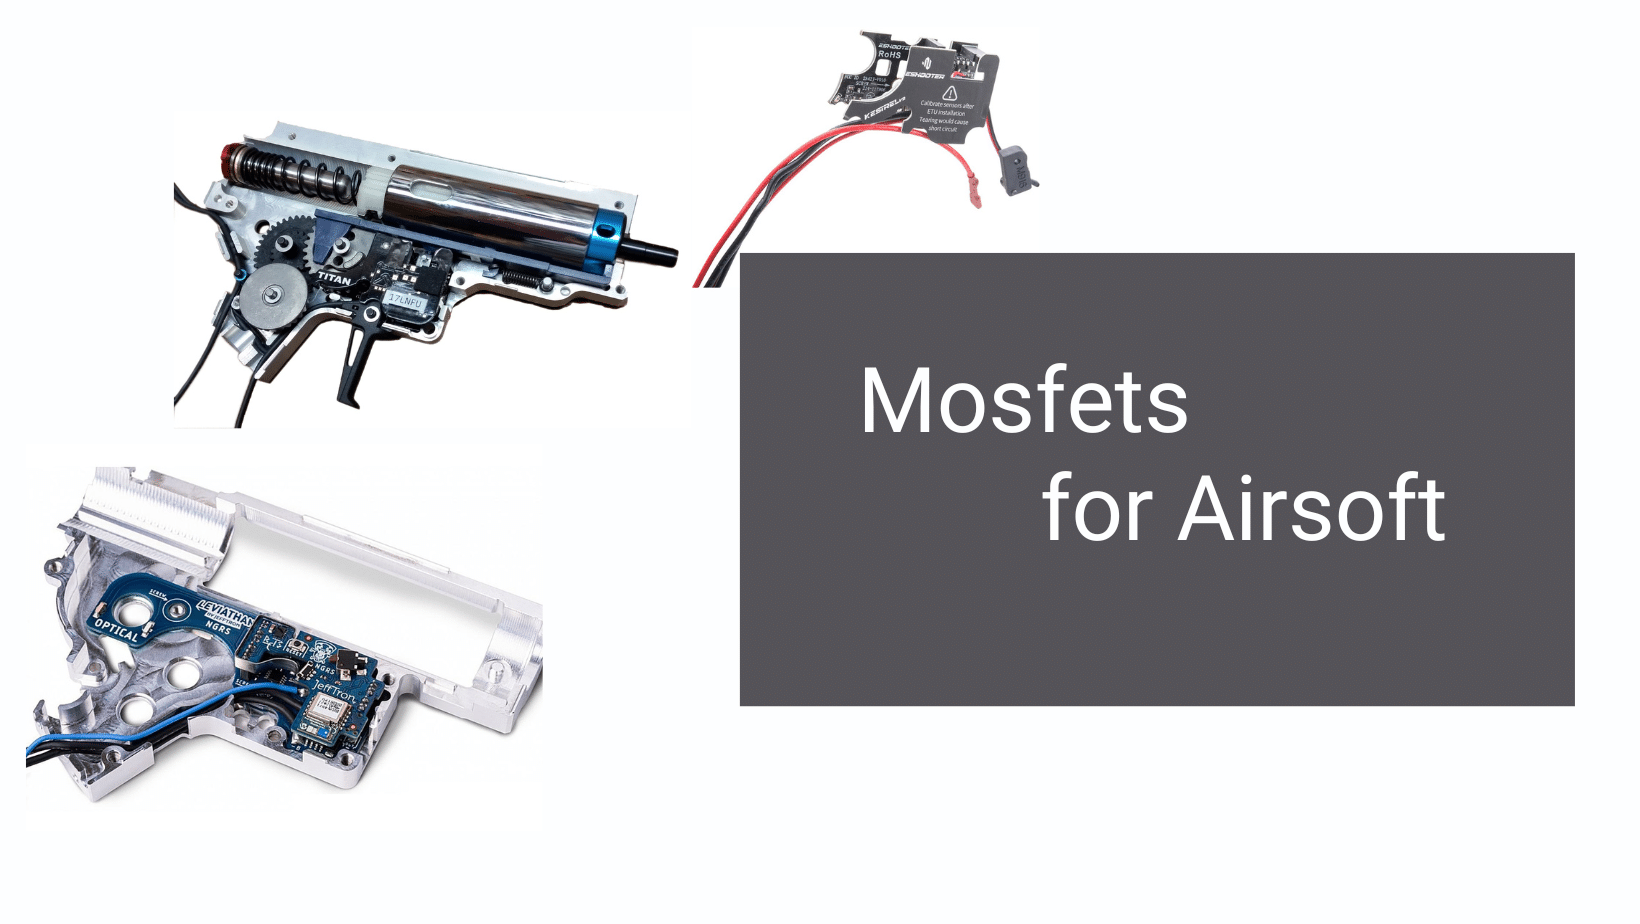
First thing, I hit up the internet. Watched a bunch of videos, read a few forum posts. Seemed straightforward enough. You basically need a MOSFET chip, a couple of resistors, some decent wire – thicker than the stock stuff, for sure – and new connectors. I ordered a little kit, one of those basic ones, nothing too fancy. Didn’t want to break the bank on my first try. The parts arrived, and I spread them out on my workbench. Looked simple enough, just a few bits and bobs. I remember thinking, “This’ll be a quick job.” Boy, was I optimistic.
The “Fun” Part: Soldering and Squeezing it In
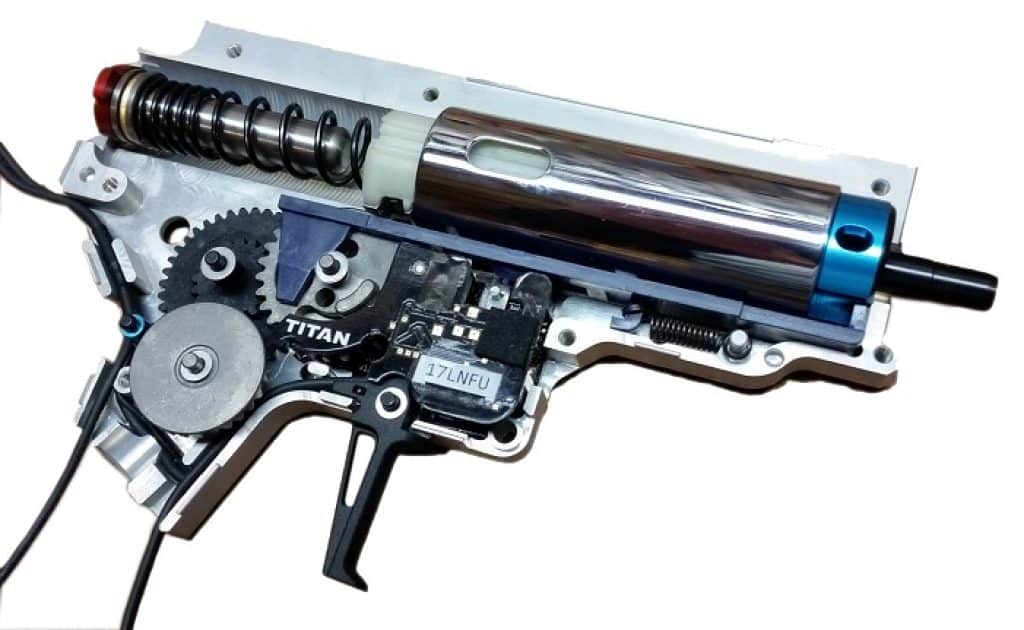
Cracking open the gearbox. That’s always a bit nerve-wracking. Springs and gears threatening to fly everywhere if you’re not careful. I took it slow, laid out a cloth so no tiny parts would go missing. Took pictures with my phone at every step so I wouldn’t forget how it all went back together. Smart move, that. Learned that the hard way on a previous project, let me tell you.
Then came the soldering. Let me tell you, my soldering skills are, well, let’s just say they’re a work in progress. Getting those wires onto the tiny legs of the MOSFET and then connecting the new trigger switch wires without creating a blobby mess took some doing. Had to redo a couple of joints. Patience, my friend, patience. And a good fume extractor, because those fumes are no joke.
The trickiest bit for me was figuring out exactly where to run the new wires. The signal wires to the trigger, the main power wires… you gotta make sure nothing gets pinched when you close the gearbox back up. I decided to re-wire the whole thing to Deans connectors too, while I was at it. Stock Tamiya connectors are just not great, they always feel a bit loose and just can’t handle higher currents as well. So, out they went.
- Got myself some nice, thicker gauge silicone wire.
- The MOSFET unit itself, tiny little thing.
- Separate, thinner signal wires specifically for the trigger contacts.
Fitting it all back into the gun’s body was another squeeze. MOSFETs, even small ones, take up a bit of extra space you didn’t know you didn’t have. Had to get creative with routing the wires around the motor and making sure the battery would still fit in its compartment. There was a moment there where I thought I’d have to dremel something, but I managed to tuck it all in.
Moment of Truth and The Sweet Sound of Success
After what felt like ages, everything was buttoned up. Double-checked, triple-checked my wiring against the diagrams I’d found online. Plugged in the battery, fingers crossed, heart doing a little drum solo. Took a deep breath and pulled the trigger.
Click-pop! That beautiful, crisp sound of the gearbox cycling instantly. The trigger response was night and day. Seriously. Like a brand new gun. No more lag, no hesitation, just immediate action. I emptied a mag in semi-auto, just enjoying how snappy it felt. Full auto was a bit more consistent too, seemed like. It just sounded healthier, you know?
Was It Worth It? Heck Yeah.
So, yeah, it was a bit of a fiddle. Took me a good afternoon, a few choice words muttered under my breath when a wire wouldn’t stay put, and a minor burn on my thumb from the soldering iron (classic, almost a rite of passage). But the improvement? Totally worth it. My trigger contacts are now just signalling the MOSFET, not carrying all that heavy current, so they should last way, way longer. And the gun just performs better, feels more responsive.
If you’re thinking about it, and you’re even slightly handy, I’d say go for it. Just take your time, watch some guides from people who actually know what they’re doing, and don’t be afraid to ask for help if you get stuck. It’s a satisfying little upgrade to do yourself. Made me feel like I actually know my gun a bit better now, inside and out. Plus, saved a few bucks compared to paying someone else to do it, and I learned something new. Win-win, I reckon. Now, what to upgrade next…
Getting Fed Up and Deciding to DIY
Alright, so I’d been having this nagging issue with my go-to airsoft rifle. You know the deal, trigger response getting a bit sluggish, sometimes it wouldn’t even fire on the first pull. Real annoying, especially in the middle of a game. I’d heard folks talking about MOSFETs, saying they’re the bee’s knees for fixing this and making your gun snappier. Figured, why not give it a shot myself? How hard could it be, right? Famous last words, sometimes.
Diving Down the Rabbit Hole of Parts and Wires
First thing, I hit up the internet. Watched a bunch of videos, read a few forum posts. Seemed straightforward enough. You basically need a MOSFET chip, a couple of resistors, some decent wire – thicker than the stock stuff, for sure – and new connectors. I ordered a little kit, one of those basic ones, nothing too fancy. Didn’t want to break the bank on my first try. The parts arrived, and I spread them out on my workbench. Looked simple enough, just a few bits and bobs. I remember thinking, “This’ll be a quick job.” Boy, was I optimistic.
The “Fun” Part: Soldering and Squeezing it In
Cracking open the gearbox. That’s always a bit nerve-wracking. Springs and gears threatening to fly everywhere if you’re not careful. I took it slow, laid out a cloth so no tiny parts would go missing. Took pictures with my phone at every step so I wouldn’t forget how it all went back together. Smart move, that. Learned that the hard way on a previous project, let me tell you.
Then came the soldering. Let me tell you, my soldering skills are, well, let’s just say they’re a work in progress. Getting those wires onto the tiny legs of the MOSFET and then connecting the new trigger switch wires without creating a blobby mess took some doing. Had to redo a couple of joints. Patience, my friend, patience. And a good fume extractor, because those fumes are no joke.
The trickiest bit for me was figuring out exactly where to run the new wires. The signal wires to the trigger, the main power wires… you gotta make sure nothing gets pinched when you close the gearbox back up. I decided to re-wire the whole thing to Deans connectors too, while I was at it. Stock Tamiya connectors are just not great, they always feel a bit loose and just can’t handle higher currents as well. So, out they went.
- Got myself some nice, thicker gauge silicone wire.
- The MOSFET unit itself, tiny little thing.
- Separate, thinner signal wires specifically for the trigger contacts.
Fitting it all back into the gun’s body was another squeeze. MOSFETs, even small ones, take up a bit of extra space you didn’t know you didn’t have. Had to get creative with routing the wires around the motor and making sure the battery would still fit in its compartment. There was a moment there where I thought I’d have to dremel something, but I managed to tuck it all in.
Moment of Truth and The Sweet Sound of Success
After what felt like ages, everything was buttoned up. Double-checked, triple-checked my wiring against the diagrams I’d found online. Plugged in the battery, fingers crossed, heart doing a little drum solo. Took a deep breath and pulled the trigger.
Click-pop! That beautiful, crisp sound of the gearbox cycling instantly. The trigger response was night and day. Seriously. Like a brand new gun. No more lag, no hesitation, just immediate action. I emptied a mag in semi-auto, just enjoying how snappy it felt. Full auto was a bit more consistent too, seemed like. It just sounded healthier, you know?
Was It Worth It? Heck Yeah.
So, yeah, it was a bit of a fiddle. Took me a good afternoon, a few choice words muttered under my breath when a wire wouldn’t stay put, and a minor burn on my thumb from the soldering iron (classic, almost a rite of passage). But the improvement? Totally worth it. My trigger contacts are now just signalling the MOSFET, not carrying all that heavy current, so they should last way, way longer. And the gun just performs better, feels more responsive.
If you’re thinking about it, and you’re even slightly handy, I’d say go for it. Just take your time, watch some guides from people who actually know what they’re doing, and don’t be afraid to ask for help if you get stuck. It’s a satisfying little upgrade to do yourself. Made me feel like I actually know my gun a bit better now, inside and out. Plus, saved a few bucks compared to paying someone else to do it, and I learned something new. Win-win, I reckon. Now, what to upgrade next…